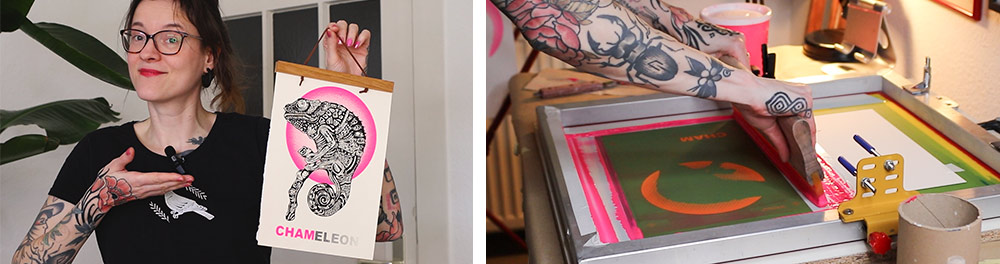
Screen printing on my new press

Hey peeps, hope you’re enjoying the start of spring. Maybe you’re out taking pictures of cherry blossoms. Or just having your first ice cream of the year outside. Or standing in the kitchen, letting the sun warm your face for a minute. Those little moments where you’re just there, not thinking about what was or what’s next. We notice the tough stuff all the time, so it’s important milking the good bits too.
Printing is one of those good bits. It´s fun, sometimes annoying, but it’s always something that pulls you right into the moment. Time disappears, plans are forgotten, lunch is missed, that run you swore you’d do today…well, it’ll still be there tomorrow.
First paper print on the new machine
Since I started screen printing on paper (around six months ago), I’ve been working with the usual basic setup: just a board and two hinge clamps. Simple, but it does the job. It’s actually great for getting started, and still solid in the long run.
But recently, I got myself a one-color screen printing press. It’s usually made for printing on fabric, like t-shirts or tote bags. The idea was that I want to explore fabric printing a bit more, and I figured, why not try both on the same machine? Paper and fabric, all in one place?
In this post, I’ll share some thoughts on both setups now that I’ve just printed my latest two-color art print on the new press. Let’s talk pros, cons, and what I’ve learned.
If you want to see how I assembled the press, you can watch a short video here on YouTube.

Preperation
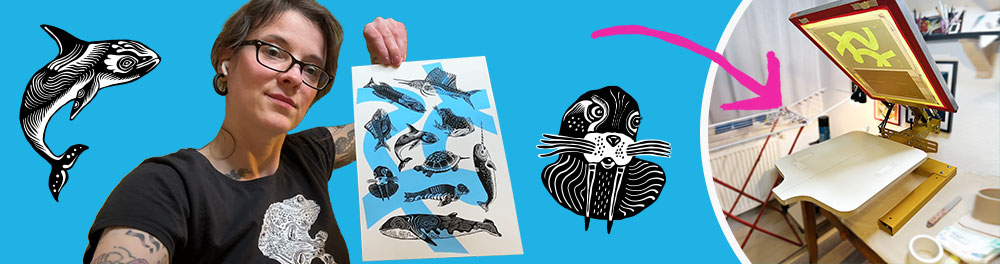
A short dive into the design: Below you can see my water animals design and the color separation in Adobe Illustrator plus registration marks. I first drew the illustration in Procreate, but since I prefer vector graphics for screen printing, I re-drew everything in Adobe Fresco (free app) on my iPad using vector brushes. I put each animal on its own layer and also kept the background separate. That makes it easier later in Illustrator to do the color separation and clean things up. I can send the file from Fresco to Illustrator with just two clicks, which is super handy.
The vector brushes in Fresco are pretty basic. Nothing fancy like the pixel brushes, but they still get the job done. The result looks a lot like my original pixel drawing, and I actually enjoy working this way. I don’t think I’d ever go back to using a drawing tablet with my computer in Illustrator.
If you’re curious about Adobe Fresco and the vector brushes, I recommend checking out Chris Piascik´s tutorials. They’re fun to watch and really inspiring. He also got me into trying frame-by-frame animations in Fresco, which I already included in 2 of my YouTube videos.

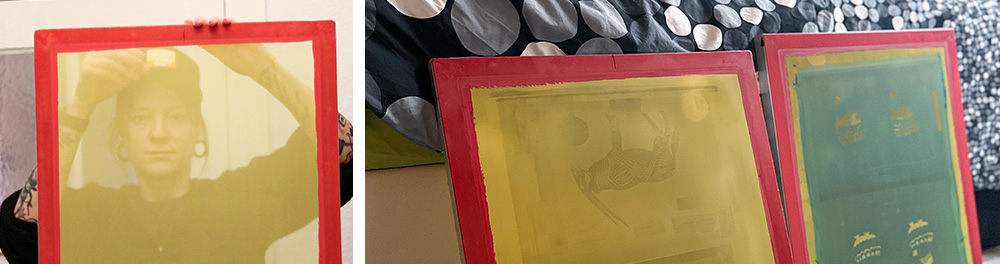
I burned both colors on separate screens (see below). For the more rough and solid background stroke that I want to print in neon blue I used a 80T mesh and I printed this lighter color first. Then let the prints dry for about an hour, and then printed the second layer in black with the main motif on top (the animals). For this more detailed illustration I used a 100T mesh.


The setup and process for printing on the press is pretty similar to using my printing table, with only a few small differences. So I won’t go into ALL the details again. But if you’re curious, I showed the full process in my last blog post and in this YouTube video. That one actually walks through everything, including how I register the paper.
For both setups, I add the same off-contact height, tape off the screen the same way, place the screen in the same position, register the paper the same way, and flood and print the same way.


But there were a few differences. I noticed some advantages with the press, but also a few downsides. Just to be clear, this comparison is only about printing on paper, not fabric.
But before we get into that, let me show you the results. No big surprise here, but I’m happy to say the final prints came out just as good as they would have on my printing table. Not better, not worse.

PROS AND CONS
Squeegee resting spot
When I was using the print table, I always had to find a place to put the squeegee between prints. And since it’s usually covered in ink, I couldn’t just lay it down anywhere. I often used a can or something similar to balance it on my kitchen table, trying to keep the orange squeegee blade from touching the surface and making a mess. But of course, that still led to the occasional ink splatter and took up way too much space.

At some point, I got myself a squeegee holder that I could attach to the screen, just to avoid the whole act. So that worked as a decent fix. But with the press, I don’t even need one anymore.
Now I have a much easier setup. I can just rest the squeegee against the print head, and it stays right there. I can lift the screen up and down without any fuss, and so far, it hasn’t tipped over once. Super practical.
I wrote “squeegee resting spot.” Is that the proper term to use? I’m wondering if it sounds too eternal, like that’s where it’s going to rest forever… like, when it dies or something. You know?
screen stays up
What I probably LOVE MOST about the press is that the screen stays up on its own once you lift it to a certain height. You can even adjust the angle so it doesn’t open too wide. That’s super useful if you’re working with very thin ink, which could otherwise run down the other side and over the frame if the screen is up too steep.
It also makes little things so much easier. Like when I need to quickly tape off the registration marks from below during printing, I now have both hands free and don’t have to hold the screen up with one hand while fiddling with tape in the other.
With the print table on the contrary, I can either keep the screen open at a 90-degree angle, which makes the ink slowly drip down, or I always have to place something between the screen and the plate to keep it slightly open, so I can remove and insert the paper between prints using both hands (see image below). But the opening angle isn’t very wide, and sometimes I end up hitting my head on it. BOING. Lol.

Printing height / plate height
The press sits on its two “feet,” so it already comes with its own height. When I place it on my kitchen table, the height of the print plate is roughly at the level of my waist or belly button, which is about 20 cm higher than the surface of my printing table. It´s a nice height to operate.

At first I was worried the height might be too much because I now have to hold the squeegee, flood, and print with my arms higher up than I’m used to. After the full print session I’d say it worked pretty well, but honestly, I wouldn’t want it to be any higher for my size. I think this is something to consider, especially if you’re on the taller or shorter side, and also depending on the height of whatever your press or print table is sitting on.
In the end I think I actually prefer this higher setup over constantly bending forward like I did with the print table. That used to give me some light back and neck pain, especially when registering the paper, which takes a bit longer.
What would probably be ideal here is a stable standing desk where you can adjust the height to your liking. But guess what, I don’t have one.
Plate size
Here, the print table wins. I can mount my A3+ screen (51 cm x 61 cm) on both the press and the print table, but the print table offers a larger plate size, which I found perfect (55 cm x 67 cm). It just gives me that little bit of extra space to feel more flexible.
The platen of the press, which came with the machine, is a bit tight at 45,5 cm x 55 cm and has a t-shirt cutout that is of no use to me when printing on paper. That limits me a bit.
Of course, I could buy an XL platen for the press without the cutout.

Setting up the off-contact height
For paper printing, I want a 3 mm gap between screen and plate. Again, the print table wins in terms of simplicity. The 3 mm is basically built-in with the hinge clamps, which have their own 3 mm height. I just need to add 3 mm on my end of the screen by taping two 5-cent coins to each side. Done.
On the press, you also have to set the off-contact height on the print head itself. To be honest, I struggled with that.
To move the print head up and down, I first have to loosen the screws with a tool, move the head evenly upward, and then tighten the screws again while making sure the head doesn’t slip back down.
It sounds easy, but I found it hard to get an even 3 mm on both sides. One side was too low, then the other. I had to redo it five or six times until I think I finally got it right.
In general, it’s a great feature. You can move the head very flexibly, which you can’t do on the print table. But I kind of wish I didn’t have to touch it again. Unfortunately, I will have to, if I want to print on fabric.

Weight
The print table is much lighter. In the end, it’s just a board that I can easily store away.
The press… ugh… heavier than I thought 23 kg would feel. Definitely not something I can just pick up and put aside quickly. So at the moment, it’s sitting next to my kitchen table on a smaller table.
Stability of plate
This might be a weird one: when I do a print stroke on the machine, the platen slightly bends downward under the pressure. That’s just how it’s built.
But for some reason, it bothers me a little. I prefer having more resistance, like I get from my printing table plate.
Conclusion
Yeah, so what do I think? What the heck! I should be smarter now than before.

I dunno, I am overthinking, for sure. To come to a solid conclusion, I need to do more paper printing on the press, which I definitely plan to do. I’d love to revisit this topic at a later point. I still really appreciate the print table for its simplicity, size, and easy storage. But I also dig the advantages of the press, like being able to keep the screen lifted, resting the squeegee, and having a more comfortable print height.
I think if I were to only ever screen print on paper (which I know I don’t want to do), I would have gone for a more advanced print table instead of the press. Something where the screen stays up and the squeegee can rest as well. Plus, I’d just get a slightly taller table to place it on.
But for now, I’m looking forward to the next prints on the machine and getting more comfortable with the adjustments.
Wohooo, the prints are in my shop
Ah, and here again, the prints on their own. I thought I like the one with the gradient best but now I am not sure anymore. I put them in my ETSY SHOP in case you are interested in owning or gifting handmade artwork. :)


And if you have 11 minutes more to invest you can watch the YouTube video on how I printed my ocean & water animals + the little animations I included. It´s in german but you can turn EN subtitle on. Else, take care!

Upcoming blog post:
I still want to write a short one about my test prints and another one about my linocut embossing machine, which I re-purposed to use as a press for my linocuts. People keep asking me about it.
Newsletter Update:
I hope you liked the last one (my first ever!)? I was so happy when I finally sent it out. I tried to give it a bit of structure by building in different sections. The next one should be ready in about two weeks.